Thursday, 21 February 2019

How to create a new Quicken data file

Quicken Support Phone NumberAs a feature of setting up Quicken, you make what Quicken calls a record: a spot where Quicken stores every one of your records (financial balances, charge card accounts, venture accounts, etc). 
You can have more than one Quicken record whenever. The vast majority won't have any desire to do this at Quicken support phone number. Be that as it may, you can (for instance) utilize distinctive documents to keep your own monetary records separate from business budgetary records. 

To set up another document with the goal that you can make accounts in it, pursue these means:

1.Choose File→New.

Quicken displays the Create New File: Dude, Are You Sure? dialog box.

2 Select the New Quicken File option button and then click OK or press Enter.

Quicken displays the Create Quicken File dialog box of quicken support phone number.

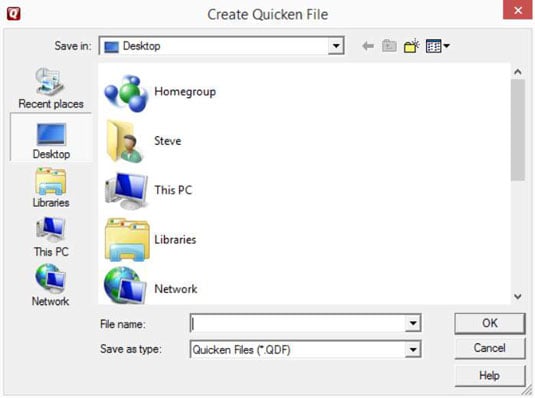
3 Enter a name for the Quicken file.

Position the cursor in the File Name text box and type some meaningful combination of letters and numbers. You don’t need to enter a file extension because Quicken support phone number supplies the correct file extension — .qdf — for you.

4. Choose an appropriate file location

Tell Quicken support number where you want to store the Quicken data files, using the Save In drop-down list box at the top of the dialog box.

5. (Optional) Sync the new file with the Quicken Cloud.

If prompted, provide your Intuit ID so Quicken support can sync the new file with any mobile device you’ve indicated that you want to use.
Quicken Support Phone Number

6. Add an account.

When Quicken displays the Add Account dialog box so you can add at least one starter account to the new file, click the Quicken support number that references the type of account you want, and then follow the by-now-familiar onscreen prompts to add the accounting quicken support phone number.

7.Run Setup.

After you complete adding a new account
(or possibly two), you see the Home tab. Click Quicken support number its get started button to finish setting up the new account.

No comments:

Post a Comment